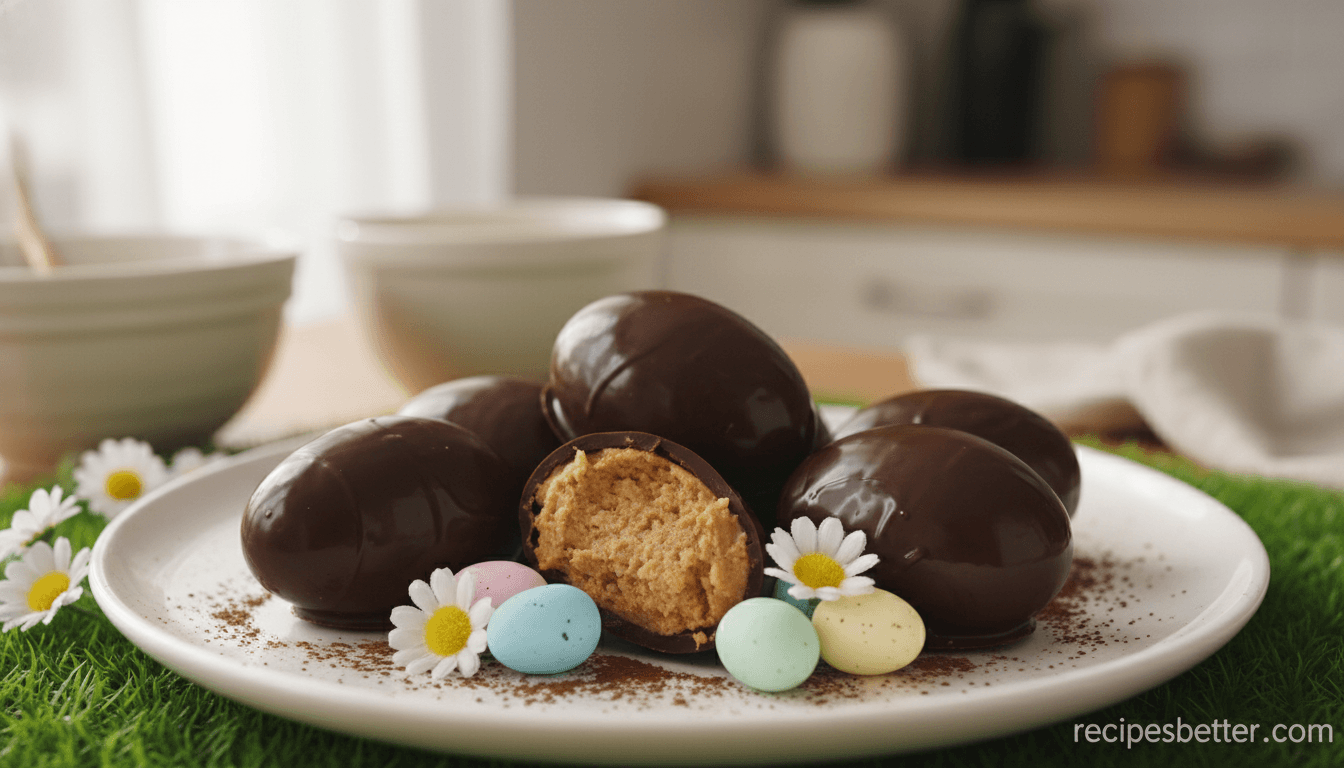
Peanut Butter Easter Eggs are an easy homemade treat with creamy peanut butter filling and a smooth chocolate coating. This Peanut Butter Easter Eggs recipe is perfect for Easter baskets, dessert trays, and make-ahead gifting. With simple ingredients and beginner-friendly steps, you can create soft, Reese’s-style eggs right in your own kitchen. They are sweet, rich, festive, and fun to decorate, making them a reliable Easter candy recipe for family gatherings, holiday sharing, and spring celebrations.
Table of Contents
Introduction & Recipe Background
Store-bought versions can’t compete with the rich, homemade flavor you control. Those popular seasonal candies often vanish from grocery shelves too quickly. Making your own treats solves this problem beautifully.
You gain complete command over your ingredients. This means a richer filling and perfect chocolate balance. Your creation will have that iconic shape fans love.
This approach captures the nostalgic taste of holidays past. Nothing from a store package matches the freshness of your kitchen creation. You tailor every bite to your personal preference.
The result is a superior reese peanut butter style dessert. It honors tradition while offering modern customization. Your homemade peanut butter eggs become a new seasonal favorite.
Why This Recipe Works: The Perfect Balance of Sweet and Salty
What separates a good homemade candy from a great one is often found in the subtle details of its core components. This recipe delivers that iconic taste through precise ingredient ratios.
The filling uses less butter than many other versions. This deliberate choice lets the rich, nutty flavor of the peanut butter remain the clear star.
A specific amount of salt is the secret weapon. It perfectly balances the sweetness of the powdered sugar. This creates a sophisticated flavor profile that is never too cloying.
You achieve a luxurious, creamy texture in the center. It rivals products from high-end confectionery shops. The mouthfeel is smooth and deeply satisfying.
This balanced approach offers several key benefits:
- Enhanced Flavor: The salt cuts through sweetness and boosts the richness of the peanut butter.
- Superior Texture: The reduced butter content creates a firm yet creamy filling that holds its shape.
- Broad Appeal: The result is a treat that delights both those with a sweet tooth and those who prefer a savory note.
Your final creation will have a professional, well-rounded taste. It proves that sometimes, less is more when you focus on perfect balance.
Ingredient Spotlight and Preparation Tips

Ingredients You’ll Need
- Creamy peanut butter
- Unsalted butter, softened
- Powdered sugar
- Vanilla extract
- Salt
- Milk chocolate chips or semi-sweet chocolate chips
- Shortening or coconut oil, optional for smoother dipping
- Sprinkles or flaky sea salt, optional for decoration
Selecting the right components is the first step toward crafting a flawless confection. The quality and type of each item directly impact your final dessert’s texture and taste.
Choosing the Right Peanut Butter
Your filling needs a creamy, no-stir peanut butter for the best results. Brands like Jif or Skippy are ideal because they are consistently emulsified.
This creates a smooth base that holds together well. Avoid natural nut butters that can separate. They often make the mixture too soft to shape properly.
The Role of Powdered Sugar and Butter in the Filling
Powdered sugar is not just for sweetness. Using 1.5 cups gives the filling necessary structure. It acts as a stabilizer so your shapes hold firm without feeling grainy.
The right amount of butter adds a rich, decadent quality. It ensures a luxurious mouthfeel and a smooth finish on your candy. These elements work together for a perfect balance.
For a stress-free process, gather all your ingredients before you begin. This simple prep step prevents mistakes and keeps your kitchen organized.
Easy Step-by-Step Method
Transforming your ingredients into beautiful candies is easier than you might think with this clear method.
Preparing the Peanut Butter Filling
Combine your creamy spread with butter and powdered sugar. Mix until the peanut butter filling becomes very thick and holds together. This stiffness is normal and perfect for molding.
Use a 1.5 tablespoon cookie scoop to portion the mixture. This tool guarantees every piece is uniform in size and weight for a professional result.
Chilling and Shaping the Eggs
Roll each scoop between your palms to form a smooth oval. Aim for the classic egg shape everyone recognizes.
Place the formed pieces on a parchment-lined tray. Immediately transfer the tray to your freezer for 30 minutes. This chill solidifies the fats.
This crucial step prevents your eggs from crumbling when dipped. A firm, cold center is the secret to a perfect chocolate shell.
Shaping, Dipping, and Troubleshooting Tips
The dipping process is where your homemade treats get their professional, glossy finish. For each peanut butter egg, use a fork to submerge it completely.
With a few simple methods, you can achieve smooth, even coatings every time.
Techniques for Perfect Egg Shapes
After chilling, your filling is ready to shape. Roll each portion into a smooth oval.
Use the palm of your hand for consistent pressure. Place each shaped piece on parchment paper.
Keep them cold until you are ready to dip. This prevents softening during handling.
Troubleshooting Common Dipping Issues
When dipping your butter eggs, tap the fork gently against the bowl’s edge. This removes extra chocolate for a thin shell.
If your piece slides off the fork, use a toothpick. Guide it onto the parchment paper carefully.
Your first few chocolate-covered candies might look messy. Your technique will improve quickly with practice.
Keep your centers in the freezer until the last second. This ensures the chocolate sets fast.
If your coating starts to harden, reheat it for a few seconds. Maintain a smooth consistency for dipping all your pieces.
| Tool | Primary Use | Pro Tip |
|---|---|---|
| Fork | Submerging and lifting candies | Tap gently to shed excess coating |
| Toothpick | Guiding sticky pieces | Use for precise placement on paper |
| Parchment Paper | Non-stick drying surface | Line your tray before starting |
| Freezer | Chilling centers before dipping | Keep candies cold until moment of use |
Using the Best Chocolate for Dipping Your Eggs

Your choice of chocolate and melting technique directly determines the quality of your candy’s finish. A smooth, glossy shell is the final touch that makes your homemade treats look and taste professional.
Selecting Quality Chocolate and Shortening
For the classic flavor, use 11.5 oz of high-quality milk chocolate chips. If you prefer a darker taste, semi-sweet chocolate chips work as a perfect substitute.
Adding a small amount of shortening to your melted chocolate is a pro tip. It creates a thinner, more professional coating that is easier to bite into.
Ensuring a Smooth, Melted Coating
You can use a double boiler to melt your chocolate gently. This method prevents burning the delicate cocoa solids.
For a quicker method, use your microwave at 50% power. Heat in 30-second intervals, stirring in between, to prevent scorching.
Always ensure your bowl is completely dry before you begin. Even a single drop of water can cause the melted chocolate to seize and become unusable.
Peanut Butter Easter Eggs: Essential Variations and Substitutions
Once you master the basic recipe, a world of creative customization opens up. You are not locked into one specific flavor or look.
This flexibility lets you tailor your homemade candy for different tastes and occasions. It is a fantastic way to use what you have on hand.
Alternate Nut Butters and Mix-Ins
The classic filling is delicious, but other creamy nut spreads work well. Almond or cashew butter can create a new flavor profile.
Just ensure your chosen spread is not the natural, oily kind. Those varieties can make the filling too soft to shape properly.
For a fun textural surprise, mix in finely crushed graham crackers. Toasted, chopped nuts are another excellent choice for added crunch.
Creative Twists to Customize Your Treat
After dipping, try a drizzle of white or dark chocolate over the set shell. This simple touch makes your creation look professionally decorated.
Sprinkle colorful jimmies on the wet coating for a festive look. For a sophisticated note, add a tiny pinch of flaky sea salt before the chocolate hardens.
You can also mold the filling into hearts, trees, or simple rounds. This makes the recipe perfect for any holiday or celebration throughout the year. If you enjoy playful, nostalgic desserts, this easy Baja Blast pie recipe is another fun treat to add to your dessert lineup.
| Variation Type | Suggestion | Final Effect |
|---|---|---|
| Nut Butter Swap | Use creamy almond butter | Delivers a subtly different, rich flavor |
| Added Crunch | Mix in crushed pretzels | Provides a satisfying salty texture contrast |
| Topping Finish | Add sprinkles or sea salt | Enhances visual appeal and taste complexity |
| Shape Change | Form into hearts or disks | Makes the candy suitable for any event |
Serving Ideas, Make-Ahead Convenience, and Storage Guidelines
The true convenience of homemade candy shines through in its serving and storage flexibility. Your batch yields about 18 delightful pieces, perfect for sharing.
This recipe is a make-ahead miracle for busy hosts. You can prepare everything days before your event.
Ideal Occasions for Enjoying Your Easter Dessert
These treats are fantastic for holiday baskets and spring parties. They also make a wonderful homemade gift any time of year.
Let your finished pieces sit at room temperature for a few minutes before serving. This softens the chocolate coating slightly for the best bite. For another bright and crowd-pleasing dessert idea for parties and celebrations, try this Mountain Dew Baja Blast pie.
Storing and Freezing for Long-Lasting Treats
For short-term keeping, place your butter eggs in the fridge. Use an airtight container to maintain freshness for about a week.
For long-term storage, the freezer is your best friend. Your candies will stay perfect for up to three months in an airtight container.
You can also prepare the peanut butter filling ahead of time. Keep the mixture covered in a bowl in your refrigerator until you are ready to shape it.
| Storage Method | Recommended Duration | Key Tip for Best Quality |
|---|---|---|
| Counter (Room Temp) | 1-2 hours for serving | Allows chocolate to soften slightly |
| Refrigerator | Up to 1 week | Use an airtight container to prevent odors |
| Freezer | Up to 3 months | Wrap pieces well or use a freezer-safe airtight container |
This approach gives you total control. You can enjoy your homemade candy whenever the craving strikes.
For general food storage and freezer safety guidance, check the FoodSafety.gov Cold Food Storage Chart.
Conclusion
With this guide, you’ve unlocked the secrets to creating professional-quality sweets in your own kitchen. This easy recipe demonstrates that impressive homemade candy is within your reach.
You have mastered the perfect balance of a creamy center and a smooth chocolate coating. The key to success lies in proper chilling in the freezer and using high-quality chocolate.
We hope this becomes your go-to treat for many celebrations to come. Your beautiful creations are sure to delight friends and family each time. If you love fun homemade desserts, you might also enjoy this classic banana split recipe for another easy sweet treat.
Don’t forget to share your delicious peanut butter eggs on social media. Tag us so we can celebrate your homemade success!
FAQ
What type of peanut butter is best for the filling?
How can I prevent the chocolate coating from cracking?
Can I use almond butter or another nut spread instead?
What’s the secret to getting a perfectly smooth, shiny coating?
How far in advance can I make these, and how should I store them?
My filling is too sticky to shape. What should I do?
Peanut Butter Easter Eggs Recipe (Easy Copycat)
Ingredients
Equipment
Method
- In a mixing bowl, beat the creamy peanut butter, softened butter, powdered sugar, vanilla extract, and salt until the filling is thick, smooth, and easy to shape.
- Use a 1 1/2 tablespoon cookie scoop to portion the filling. Roll each portion into an oval and gently shape it into an egg.
- Place the shaped eggs on a parchment-lined baking sheet and freeze for 30 minutes, or until firm and easy to dip.
- Melt the chocolate chips with the shortening in a microwave-safe bowl in 30-second intervals at 50% power, stirring between each interval, until smooth. You can also use a double boiler.
- Dip each chilled egg into the melted chocolate using a fork. Tap the fork gently on the side of the bowl to remove excess chocolate, then transfer the coated egg back to the parchment paper.
- Add sprinkles or flaky sea salt while the coating is still wet, if desired. Let the chocolate set completely before serving or storing.
1 thought on “Peanut Butter Easter Eggs Recipe (Easy Copycat)”
Comments are closed.