
I’ll admit it — when cottage cheese ice cream started showing up everywhere online, I was skeptical. The idea of blending a tub of cottage cheese and calling it dessert sounded like one of those trends that looks better on camera than it tastes on a spoon. But after testing it in my own kitchen, I get it now. Blended completely smooth and frozen the right way, this stuff is genuinely creamy, scoopable, and packed with protein — and you do not need a fancy machine to make it work.
My first couple of attempts, though? Ice. Cold. Bricks. I pulled them out of the freezer expecting soft-serve and got something closer to a popsicle you’d have to chip at with a spoon. So I went back to the drawing board and tested batch after batch until I figured out exactly what separates a creamy, scoopable result from an icy disappointment. That tested version — the one that actually works — is what you’ll find below.
Table of Contents
Does It Actually Taste Like Cottage Cheese?
This is the first thing everyone wants to know, so let’s address it head-on: no, it does not taste like cottage cheese — at least not once you’ve blended it properly.
Here’s the thing about cottage cheese: its flavor and texture come almost entirely from the curds. Blend those curds into oblivion and what’s left behind is a smooth, creamy base with a light tang — something that lands much closer to frozen yogurt than to anything you’d recognize from the tub.
I’ll be honest with you, though: this isn’t a perfect stand-in for dense, churned, full-fat ice cream. It’s its own category — lighter, creamier, with a subtle tang that I happen to love. If you want to play that tang up rather than hide it, a squeeze of lemon juice turns the whole thing into something that tastes remarkably like frozen cheesecake.
Why This High-Protein Ice Cream Earns a Spot in Your Freezer
- The protein numbers are real. This isn’t a “technically has some protein” dessert — it’s a legitimate protein source you can eat for dessert or as a recovery snack.
- Your blender does all the work. No ice cream maker, no Ninja Creami required (though it works great in one if you have it).
- It comes out creamy, not icy — as long as you follow the freezing method below, which is the part most recipes skip over.
- The cottage cheese flavor disappears. Blended smooth, it just tastes creamy — nobody will guess the base ingredient.
- It’s a blank canvas. Chocolate, strawberry, mint, cheesecake — the flavor possibilities are nearly endless.
- It comes together fast. A few minutes of blending is most of the work; the freezer handles the rest.
If you’ve been looking for a dessert that doesn’t feel like a compromise — something that satisfies a sweet craving while actually doing something nutritionally useful — this is exactly that. If you’re building more high-protein meals into your week, my healthy chicken salad recipe is another one I make on repeat.
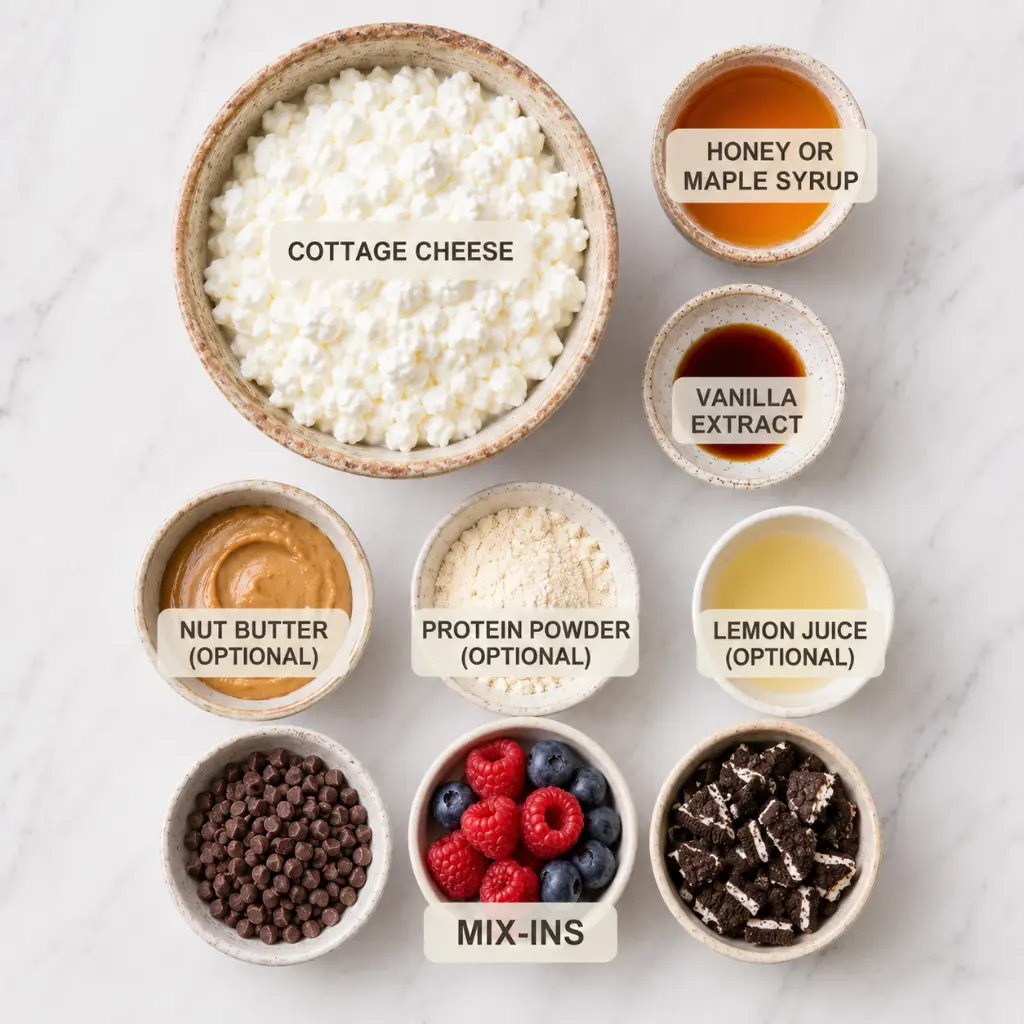
What You’ll Need (and Why Each Choice Matters)
The ingredient list is short, but a few choices here make a real difference in how this turns out:
- Cottage cheese — reach for full-fat. It makes a noticeably richer, creamier ice cream, and the extra fat actually helps it freeze into something scoopable instead of a solid block. Low-fat versions work in a pinch, but they freeze harder and taste thinner. One more thing: pick a fresh, mild-tasting brand. An overly tangy cottage cheese will carry that sourness straight into your dessert.
- Honey or maple syrup — beyond sweetness, sugar plays a real functional role here. It lowers the freezing point of the mixture, which is part of why this doesn’t turn into a brick the way plain blended dairy would.
- Vanilla extract — this is what makes the base taste like “ice cream” rather than “sweetened cheese.” Don’t skip it.
- Nut butter (optional) — a spoonful adds extra fat, which translates to extra creaminess.
- Protein powder (optional) — if you want to push the protein numbers even higher, blend some in. Just add a splash more liquid so the base doesn’t get too thick.
- A squeeze of lemon juice (optional) — this nudges the flavor toward cheesecake territory, which I personally love.
- Mix-ins — chocolate chips, fresh berries, crushed cookies, whatever sounds good to you.
For some perspective on the protein side of things: 100 grams of cottage cheese delivers around 11 grams of protein according to USDA FoodData Central, which is what makes this such a protein powerhouse.
Two Ways to Make It
You’ve got options here depending on what equipment you have sitting in your kitchen.
Method 1: Blender + Freezer (No Machine)
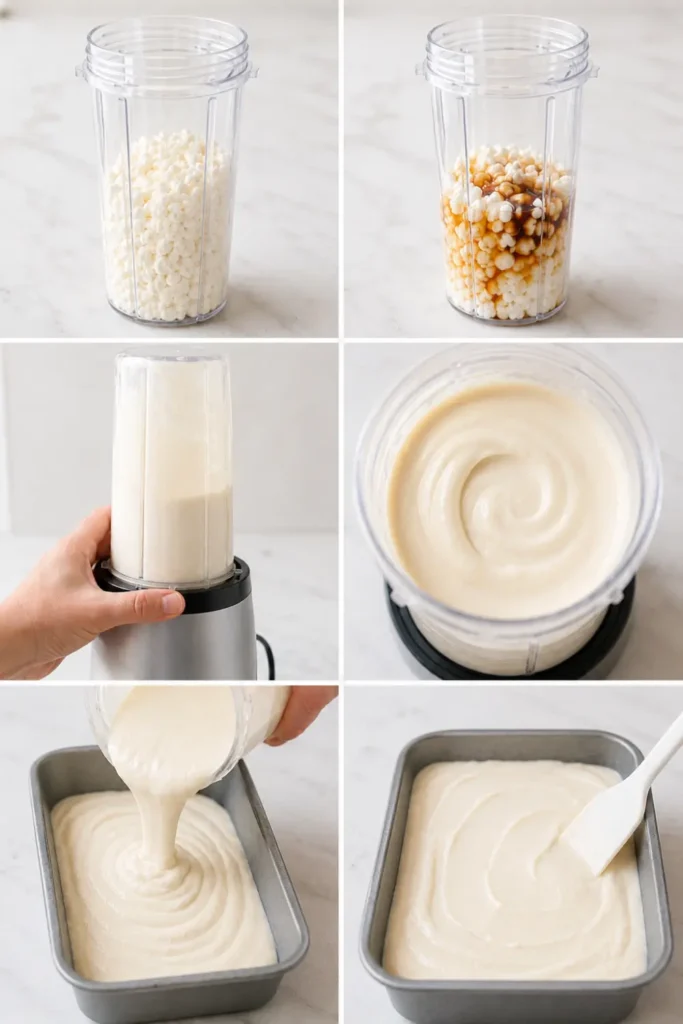
- Blend everything until completely smooth. Cottage cheese, your sweetener, vanilla, and any flavorings go into the blender together. Run it longer than you think you need to — there should be zero visible curds left. This step single-handedly determines whether your final texture is creamy or grainy.
- Pour the mixture into a loaf pan or any freezer-safe container with a flat bottom.
- Stir it every hour for about 4 to 5 hours as it freezes. I know this sounds tedious, but this single step is the difference between creamy soft-serve and an icy block. Each stir breaks up the ice crystals before they have a chance to form into something solid.
- Pull it out and let it sit on the counter for about 10 minutes before you try to scoop it.
Method 2: Ninja Creami
- Blend your base and pour it directly into the Creami pint container. Freeze it flat for a full 24 hours — don’t rush this part.
- Run it on the ice cream setting (or “lite ice cream” if your model has that option). When it first comes out, it’ll look crumbly and powdery — that’s completely normal at this stage.
- Pour in a splash of milk and run the re-spin function once or twice until the texture turns smooth and creamy.
- Add your mix-ins last, using the mix-in cycle so they get folded in rather than pulverized.
If you already love your Creami for other frozen treats, check out more Ninja Creami recipes and experiment with this base the same way.
What Actually Keeps This Creamy (Not Icy)
I went through more icy, disappointing batches than I want to admit before landing on this method, so let me save you the trial and error:
- Blend it longer than feels necessary. Any curds left behind become grainy little flecks once frozen. When in doubt, blend another 30 seconds.
- Don’t reach for low-fat cottage cheese. The fat content is doing real work here — it’s what keeps the texture from setting up into a solid block.
- If you’re going the no-machine route, commit to the hourly stirs. This is genuinely the single most important step for texture. Skip it and you’ll end up with something closer to a fruit pop than ice cream.
- The sweetener isn’t just for taste. Honey and maple syrup both lower the freezing point of the mixture, which keeps the final texture soft enough to scoop.
- Give it 10 minutes on the counter before scooping. This sets harder than churned ice cream straight out of the freezer, so a little patience goes a long way.
Flavor Variations Worth Trying
Once you’ve got the vanilla base down, the fun part starts. Here are the flavors I come back to most:
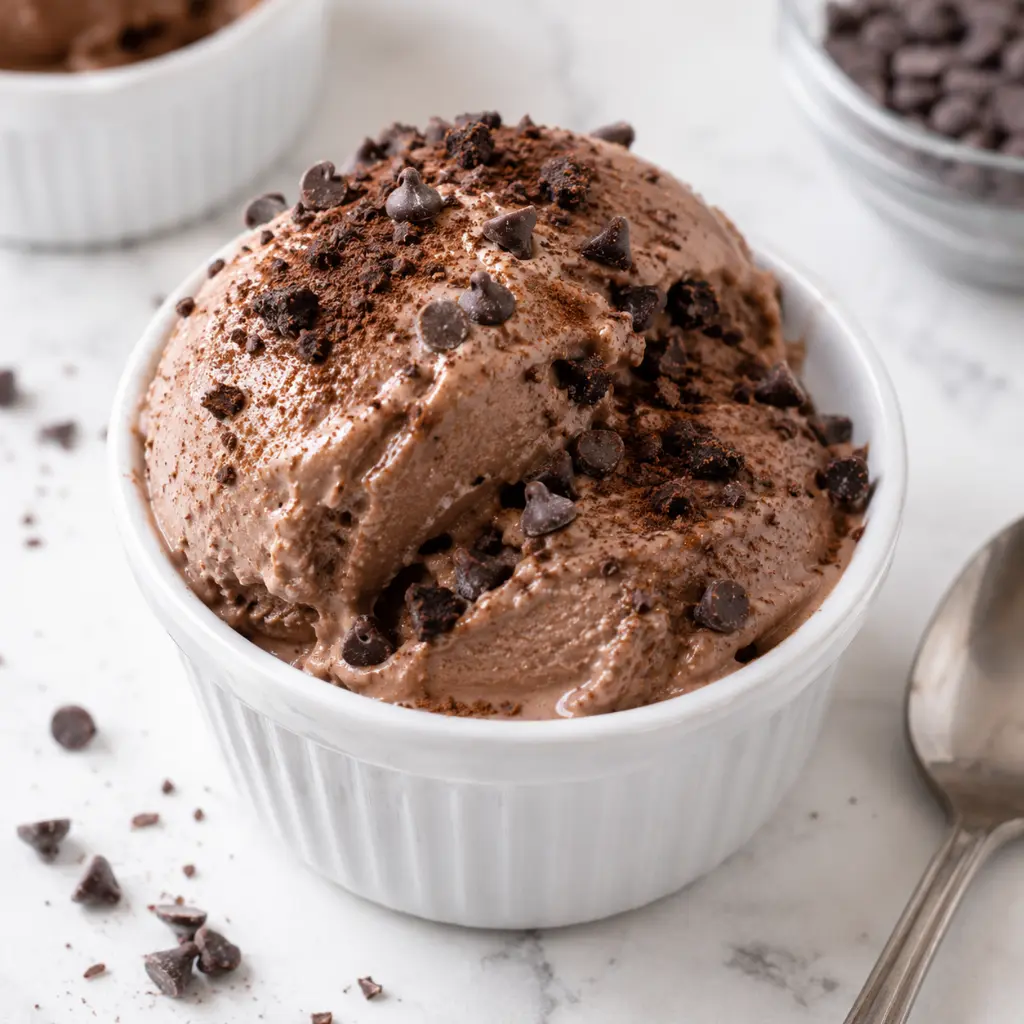
Chocolate
Blend in a few tablespoons of cocoa powder along with a touch of extra sweetener — cocoa can taste bitter without it. Fold in mini chocolate chips at the end for a chocolate-chip version. In my house, this is always the first one gone.
Strawberry Cheesecake
Blend fresh or frozen strawberries straight into the base along with a squeeze of lemon juice. The lemon is the secret here — it transforms the whole thing into something that tastes like frozen strawberry cheesecake.
Mint Chocolate Chip
A few drops of peppermint extract blended into the base, with chocolate chips folded in afterward. Go easy on the peppermint extract — it’s stronger than you’d expect, and a little overshoots quickly into toothpaste territory.
Keto-Friendly / Lower Sugar
Swap the honey for whatever keto-friendly sweetener you usually reach for. Because the full-fat cottage cheese is doing most of the work for texture, you don’t lose much creaminess even without the sugar.
Blueberry
Blend blueberries directly into the base for a soft purple color throughout, or swirl in a spoonful of blueberry preserves after blending for a marbled effect.
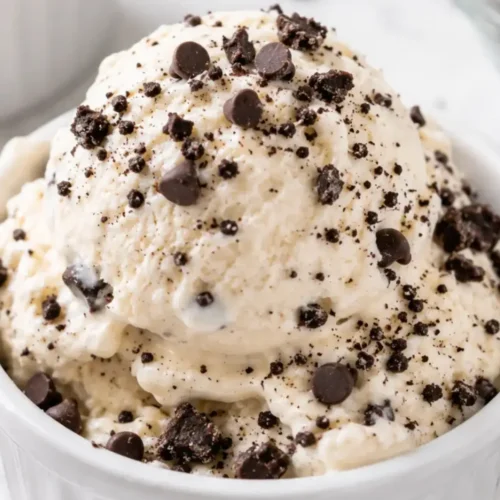
Other combinations worth a try: cookies and cream, peach, salted caramel, pistachio — honestly, this base takes well to almost anything. If you love playing with frozen flavors, my Grapico ice cream recipe is another fun one to try.
Nutrition Breakdown (Per Serving)
The exact numbers shift depending on your sweetener, mix-ins, and whether you add protein powder, but here’s the general picture:
| Per serving | Amount |
|---|---|
| Calories | (see recipe card) |
| Protein | High — scales directly with the cottage cheese used |
| Carbs | (see recipe card) |
| Fat | (see recipe card) |
| Sugar | Depends on sweetener choice |
One thing I want to be upfront about: if you go looking at other cottage cheese ice cream recipes online, you’ll notice the protein numbers vary wildly — some recipes report numbers in the 40+ gram range while others land much lower. The difference usually comes down to whether a recipe is reporting nutrition for the whole batch or per individual serving, and whether protein powder was blended in. For reference, cottage cheese on its own has roughly 218% more protein than vanilla ice cream gram for gram — so even without any add-ins, you’re starting from a meaningfully different nutritional baseline than a regular pint from the store. I’m giving you per-serving math here, and yes, it climbs even further if you add protein powder.
Storing It Properly
Keep this in an airtight container in the freezer, and it’ll stay good for roughly 2 weeks. Press a piece of parchment paper or plastic wrap directly against the surface before sealing — this small step keeps ice crystals from forming on top.
Because this freezes firmer than store-bought ice cream, plan on letting it sit out for about 10 minutes before scooping. If you made a no-machine batch, it’s at its absolute creamiest within the first few days. A Ninja Creami pint, on the other hand, can simply be re-spun whenever you’re ready for another bowl.
Troubleshooting Common Problems
If your batch didn’t turn out quite right, it’s almost always one of these:
- Texture is icy or rock-hard: Most likely culprit is skipping the hourly stirs, or using low-fat cottage cheese instead of full-fat. Both matter more than they seem like they should.
- Texture is grainy: The base wasn’t blended long enough — any remaining curds turn into gritty little flecks once frozen. Blend it longer than feels necessary.
- Tastes too tangy or sour: Try a fresher, milder cottage cheese brand and a bit more sweetener — or lean into it with lemon juice and turn it into a cheesecake-flavored version instead.
- Won’t scoop: Give it 10 minutes on the counter, and next time, try not to freeze it longer than necessary.
High-Protein Cottage Cheese Ice Cream (No Machine)
Equipment
- Blender
- Loaf pan or freezer-safe container
- Ninja Creami (optional)
- Measuring cups and spoons
- Spatula
Ingredients
Base Ingredients
- 2 cups full-fat cottage cheese Choose a fresh, mild brand — full-fat gives the creamiest, most scoopable texture
- 3 tablespoons honey or maple syrup Helps lower the freezing point so the ice cream stays soft and scoopable
- 1 teaspoon vanilla extract Rounds out the flavor and makes the base taste like real ice cream
Optional Add-Ins
- 1 tablespoon nut butter Adds extra fat for a creamier texture
- 1 scoop protein powder Optional — add a splash more liquid if using, to keep the base from getting too thick
- 1 teaspoon lemon juice Nudges the flavor toward a cheesecake-style taste
- 1/2 cup mix-ins of choice Chocolate chips, fresh berries, crushed cookies, etc.
Instructions
- Blend the base. Add the cottage cheese, honey or maple syrup, vanilla extract, and any flavorings (such as cocoa powder, fruit, or extracts) to a blender. Blend until completely smooth — run it longer than feels necessary. There should be zero visible curds left. This step determines whether your final texture is creamy or grainy.
- Pour into a container. Transfer the smooth mixture into a loaf pan or any freezer-safe container with a flat bottom.
- Freeze and stir hourly. Place in the freezer for 4 to 5 hours total, stirring every hour. This step is essential — each stir breaks up ice crystals before they form, keeping the texture creamy instead of icy. Do not skip this.
- Fold in mix-ins. If using chocolate chips, berries, or crushed cookies, fold them in during one of the later stirs so they’re evenly distributed.
- Rest before scooping. Once fully frozen, let the container sit on the counter for about 10 minutes before scooping. This sets harder than churned ice cream, so a little patience goes a long way.
- Optional — Ninja Creami method. Blend the base and pour into the Creami pint container. Freeze flat for a full 24 hours. Run on the ice cream or ‘lite ice cream’ setting — it will look powdery at first, which is normal. Add a splash of milk and re-spin once or twice until creamy. Add mix-ins last using the mix-in cycle.
Notes
- Full-fat cottage cheese is non-negotiable for texture. The fat content is what keeps this from freezing into a solid block — low-fat versions freeze noticeably harder and taste thinner.
- The hourly stir is the whole game. I went through more icy, disappointing batches than I’d like to admit before realizing that consistent stirring during the freeze is what separates creamy soft-serve from an ice brick.
- Blend longer than feels necessary. Any leftover curds turn into grainy flecks once frozen — when in doubt, blend another 30 seconds.
- The sweetener does double duty. Honey and maple syrup aren’t just for flavor — they lower the freezing point and keep the texture soft enough to scoop.
- Want it to taste like cheesecake? A squeeze of lemon juice leans into the natural tang of the cottage cheese instead of fighting it, and the result tastes remarkably like frozen cheesecake.
- Storage: Keep in an airtight container in the freezer for up to 2 weeks. Press parchment or plastic wrap directly against the surface before sealing to limit ice crystals. No-machine batches are creamiest within the first few days; a Ninja Creami pint can simply be re-spun whenever you want more.
Frequently Asked Questions
Can you actually make ice cream out of cottage cheese?
Yes — and once you’ve tried it properly blended, it’s hard to go back to thinking of it as just a savory snack. Blend it completely smooth, freeze it (stirring hourly if you don’t have a machine), and you end up with a creamy, high-protein dessert. A blender and freezer are all you really need, though a Ninja Creami gives an even smoother finish if you have one.
Is cottage cheese ice cream actually good for you?
When it’s blended properly, it’s genuinely tasty — not a “health food that tastes like punishment” situation. Nutritionally, it’s a smart trade: more protein and typically less sugar than a regular pint of ice cream. Cottage cheese itself is rich in protein with a low glycemic index, which is part of why it works so well as a dessert base.
Will I be able to taste the cottage cheese?
Not if it’s blended fully smooth. The curds and that distinctive texture disappear completely, leaving behind something creamy with just a gentle tang — much closer to frozen yogurt than to anything from the tub. Add a little lemon juice and that tang reads as cheesecake instead.
Do I need a Ninja Creami for this to work?
No. The Creami produces an extra-smooth result if you happen to have one, but the blend-and-freeze method with hourly stirring gets you a genuinely creamy texture using nothing more than a regular blender and your freezer.
How much protein does this actually have?
It depends on the cottage cheese you use and your serving size, but 100 grams of cottage cheese contains roughly 11 grams of protein on its own — so a half-cup serving is already a meaningful protein contribution before any mix-ins. Add protein powder and that number climbs further.
What’s the best cottage cheese to use here?
Full-fat, for sure — it’s what gives you that creamy, scoopable texture instead of a hard block. Beyond that, look for a fresh, mild brand. An overly tangy cottage cheese will carry that sourness through to the final product.
Once you’ve made this once, I’d bet it earns a permanent spot in your freezer rotation. Keep a batch on hand and rotate through the flavors above depending on what you’re in the mood for — there’s genuinely a version here for every craving.